Musi: Practice with your ensemble anytime, anywhere - at the tap of a foot.

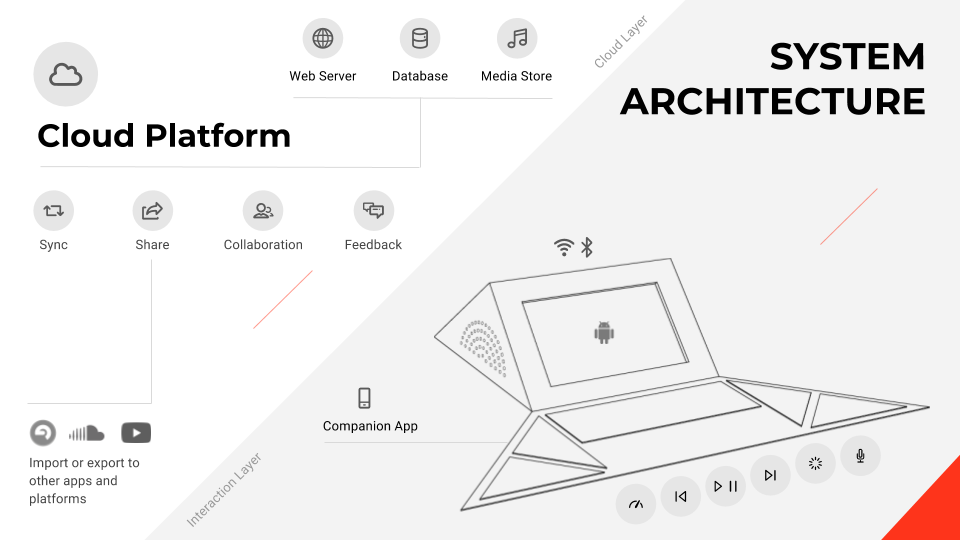
System Concept & Architecture
With Musi, you can practice with your ensemble anytime, anywhere - at just the tap of a foot.
Musi’s system architecture is comprised of two layers.
With the interaction layer, users can:
The system’s cloud layer is responsible for:
Musi’s system architecture is comprised of two layers.
With the interaction layer, users can:
- Control the device’s recording, playback, and scrolling functionalities by tapping the corresponding buttons with their feet
- View, playback, share, and comment on recordings with peers in their network
The system’s cloud layer is responsible for:
- Syncing recordings between the Musi device and the user’s cloud
- Storing the user’s body of recordings in their account’s cloud
- Connecting user accounts to form the Musi social network
- Facilitating compatibility and sharing across other music platforms, such as SoundCloud and YouTube
Demo Goals
Our overarching goal for the demo was to illustrate our value proposition: that with Musi, musicians can practice with their ensemble anytime, anywhere - at just the tap of a foot.
We sought to evoke the feeling of practicing alone, and how musicians spend this time working on technique as well as reflecting on their musical styling and performance. We also sought to illustrate how Musi augments this experience by bringing users’ musical community “into the room” with them by allowing users to share tracks, play alongside the accompanying tracks, and comment on their own and their peer’s recordings.
We identified six key interactions that would best illustrate how Musi support musicians in practice and guide our demo plan.
- Practice solo with metronome
- Listen to peer track
- Practice alongside peer track
- Record solo track
- Playback duet tracks
- Share recording with peer
System Demo Process
To demonstrate how our system can better support musicians during practice and connect them with their ensemble members, we wrote out a scenario in which one team member would play our target user (a music student), one team member would serve as the narrator, and two team members would facilitate as wizards.
We used the following materials to illustrate the system’s user experience:
The narrator reads the following script as the actor and wizards enact each key interaction:
Narrator: Sam is a music major studying trumpet performance. She is currently involved in several different ensembles, and while she spends several hours a week rehearsing with them, she spends many more hours each week practicing alone.
Today, she is a practicing a trumpet duet that she will be performing next week. She and her duet partner, Joe, have very busy schedules, and probably won’t have time to rehearse together until the day before the performance, but they both want to make sure they have a mutual understanding of the tempo, dynamics, and musical style with which they’ll be performing the piece.
Sam has received a notification on her phone indicating that Joe has shared his part with her. She loads his part into Musi so she can practice alongside it. Before she listens and practices with it, however, she wants to first practice part of the piece alone at her tempo.
Sam uses Musi to set the metronome, and practices a few measures of her part.
Sam then wants to listen to Joe’s part. She hits “play” to listen to his track. She reflects on his tempo and style. She notices that his dynamics do not change within the piece, and makes a comment on the app that they should discuss dynamics at their rehearsal.
Sam then goes back to play alongside Joe’s accompanying track. This helps her get a better understanding of where they might have difficulty with their parts’ different rhythms.
Now, Sam has a good sense of her part. She records her part with Musi.
Once Sam stops the recording, it is automatically updated to her cloud. She can easily listen to the most recent recording on Musi. She wants to hear how their parts sound together, so she taps “play” to listen and reflect.
She’s happy with this interpretation, so she opens the app, where she sees her most recent upload. She shares her recording and comments with Joe. She also shares it with her trumpet teacher, so he can listen to it and they can discuss it at her lesson tomorrow.
We used the following materials to illustrate the system’s user experience:
- the physical prototype to illustrate the foot-based interactions
- an iPad to demonstrate the physical device’s graphical user interface by mirroring the wizard’s laptop
- an external speaker to ensure audience members could clearly hear the recordings and metronome
- and a laptop used by the wizards to manipulate the recording, playback, and scrolling process as necessary
The narrator reads the following script as the actor and wizards enact each key interaction:
Narrator: Sam is a music major studying trumpet performance. She is currently involved in several different ensembles, and while she spends several hours a week rehearsing with them, she spends many more hours each week practicing alone.
Today, she is a practicing a trumpet duet that she will be performing next week. She and her duet partner, Joe, have very busy schedules, and probably won’t have time to rehearse together until the day before the performance, but they both want to make sure they have a mutual understanding of the tempo, dynamics, and musical style with which they’ll be performing the piece.
Sam has received a notification on her phone indicating that Joe has shared his part with her. She loads his part into Musi so she can practice alongside it. Before she listens and practices with it, however, she wants to first practice part of the piece alone at her tempo.
Sam uses Musi to set the metronome, and practices a few measures of her part.
Sam then wants to listen to Joe’s part. She hits “play” to listen to his track. She reflects on his tempo and style. She notices that his dynamics do not change within the piece, and makes a comment on the app that they should discuss dynamics at their rehearsal.
Sam then goes back to play alongside Joe’s accompanying track. This helps her get a better understanding of where they might have difficulty with their parts’ different rhythms.
Now, Sam has a good sense of her part. She records her part with Musi.
Once Sam stops the recording, it is automatically updated to her cloud. She can easily listen to the most recent recording on Musi. She wants to hear how their parts sound together, so she taps “play” to listen and reflect.
She’s happy with this interpretation, so she opens the app, where she sees her most recent upload. She shares her recording and comments with Joe. She also shares it with her trumpet teacher, so he can listen to it and they can discuss it at her lesson tomorrow.
Prototyping Process
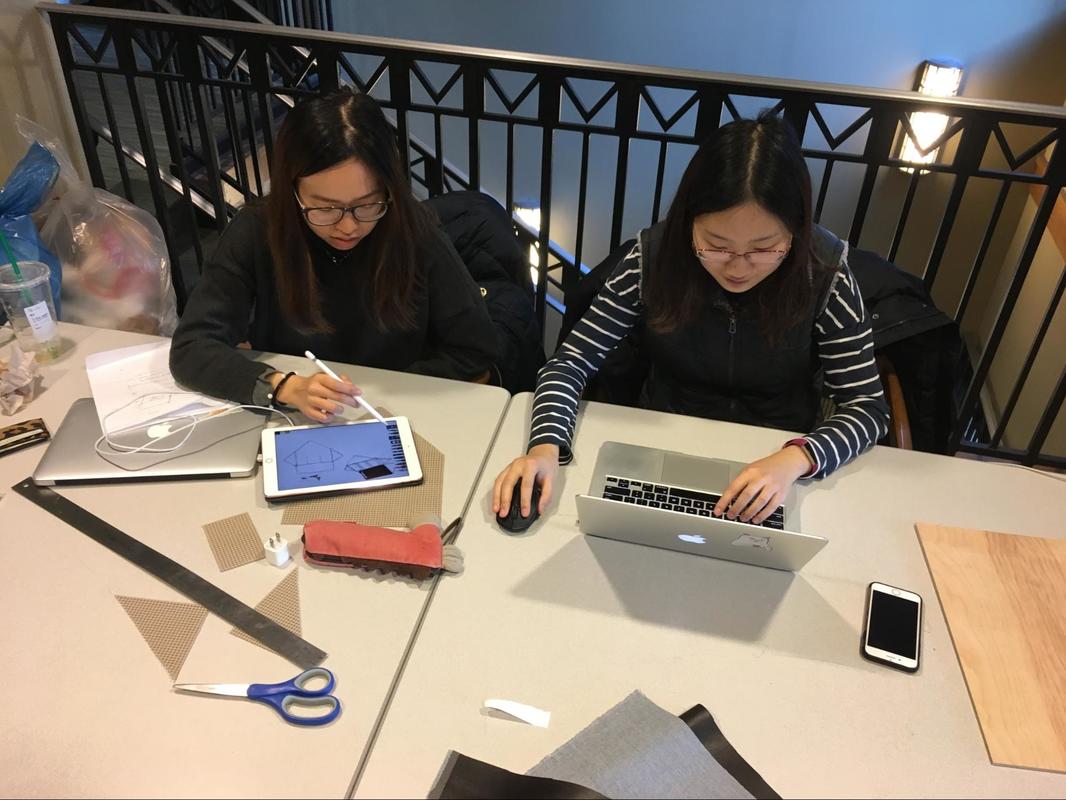
We divided the prototyping task to cover the system’s backend functionalities, the device’s physical appearance, and the companion mobile application. We took different roles to tackle these parts.
Backend
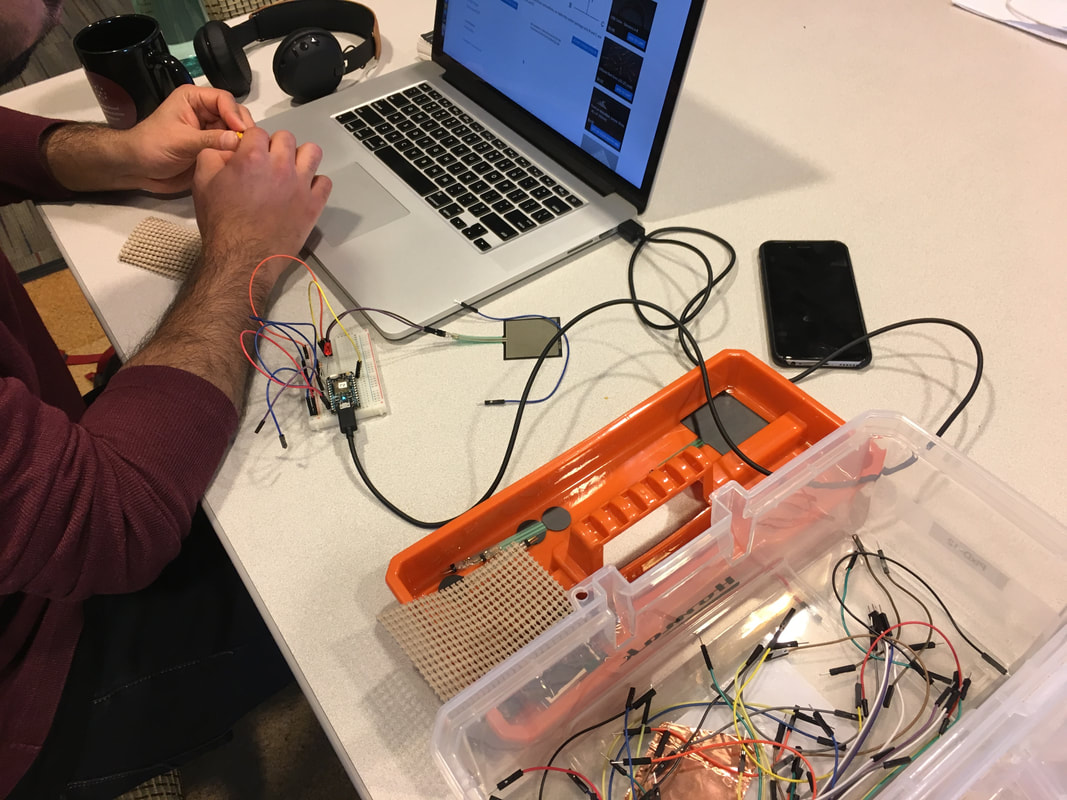
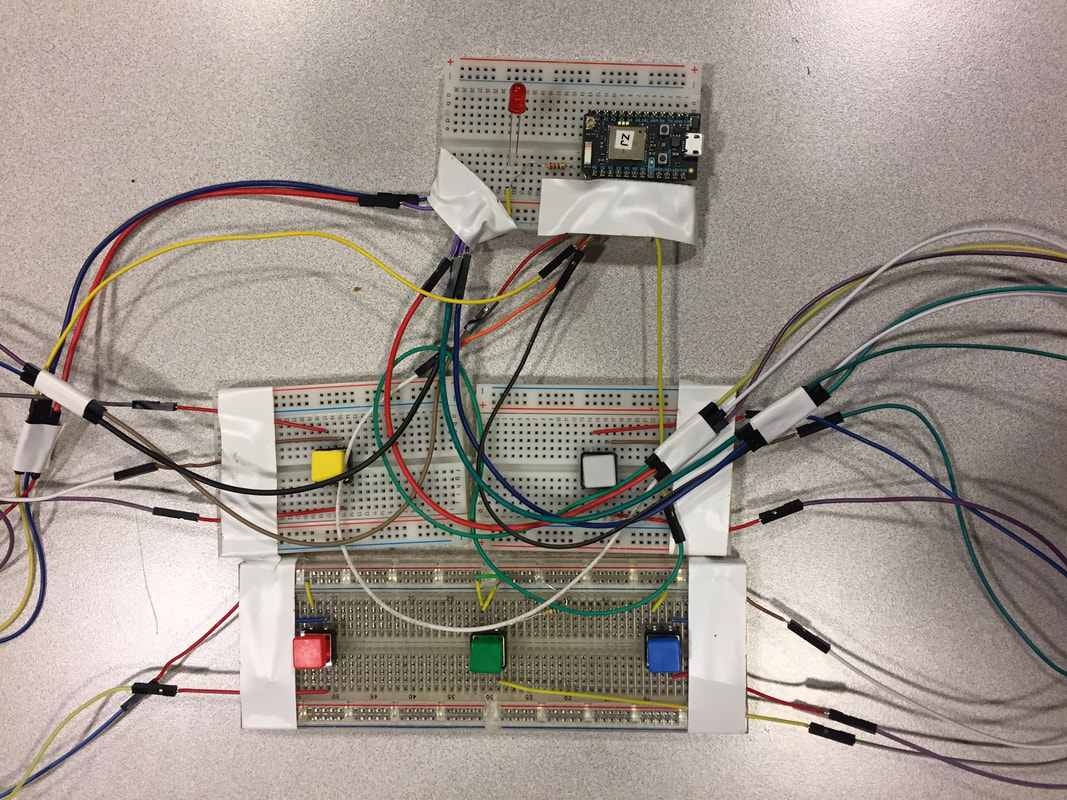
At first, we explored using Force Sensitive Resistors to control the system’s recording, playback, and scrolling functions. We learned, however, that the FSRs were very sensitive and not as clear for the user to gauge whether or not they had actually “pressed” a button. We decided to develop our prototype using buttons for better control; we also found that the physicality of the button’s “clicking” provides the user with a clearer indication that the button had been pressed.
Backend
At first, we explored using Force Sensitive Resistors to control the system’s recording, playback, and scrolling functions. We learned, however, that the FSRs were very sensitive and not as clear for the user to gauge whether or not they had actually “pressed” a button. We decided to develop our prototype using buttons for better control; we also found that the physicality of the button’s “clicking” provides the user with a clearer indication that the button had been pressed.
|
|
Look and Feel
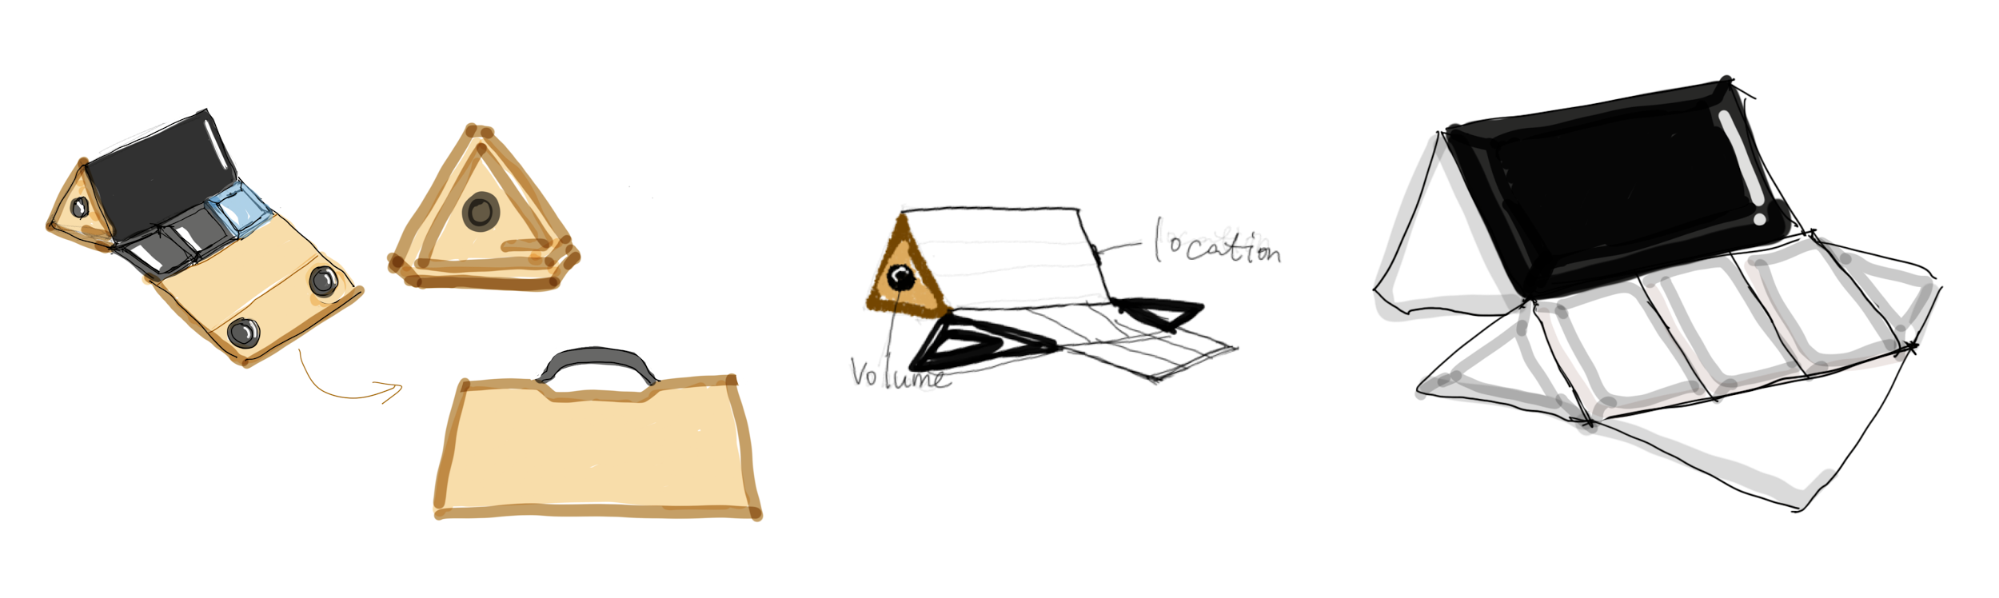
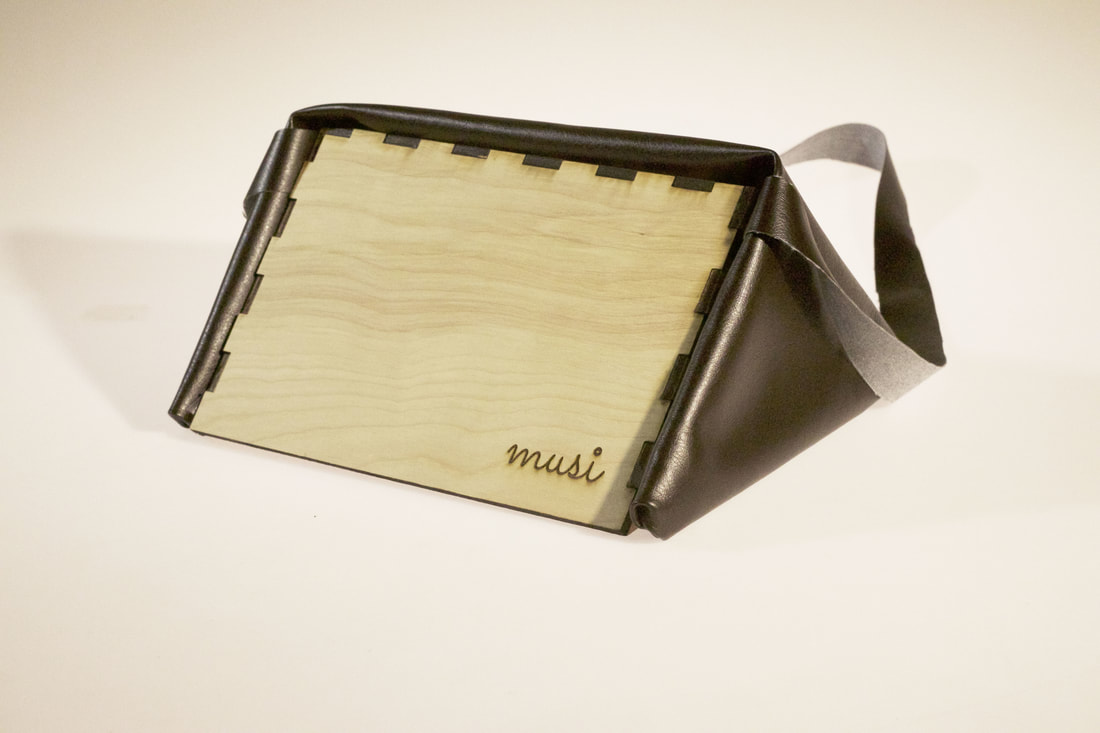
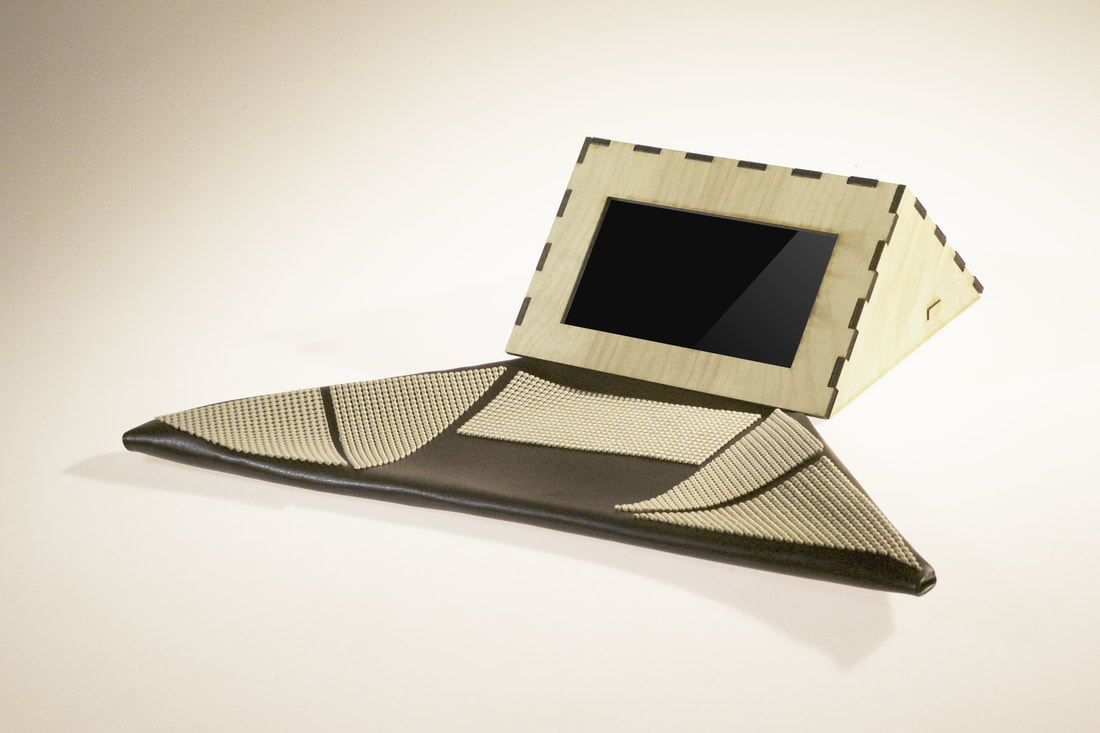
We started by gathering images of different speakers and creating mood boards on Pinterest. We decided to create a vintage-inspired look that would resonate with our main target user – classical musicians. We wanted the surface texture and color of the product to mimic vintage speakers and classical instruments. Therefore we picked wood to make the body of our speaker and looked for beige and brown fabrics for the soft part.

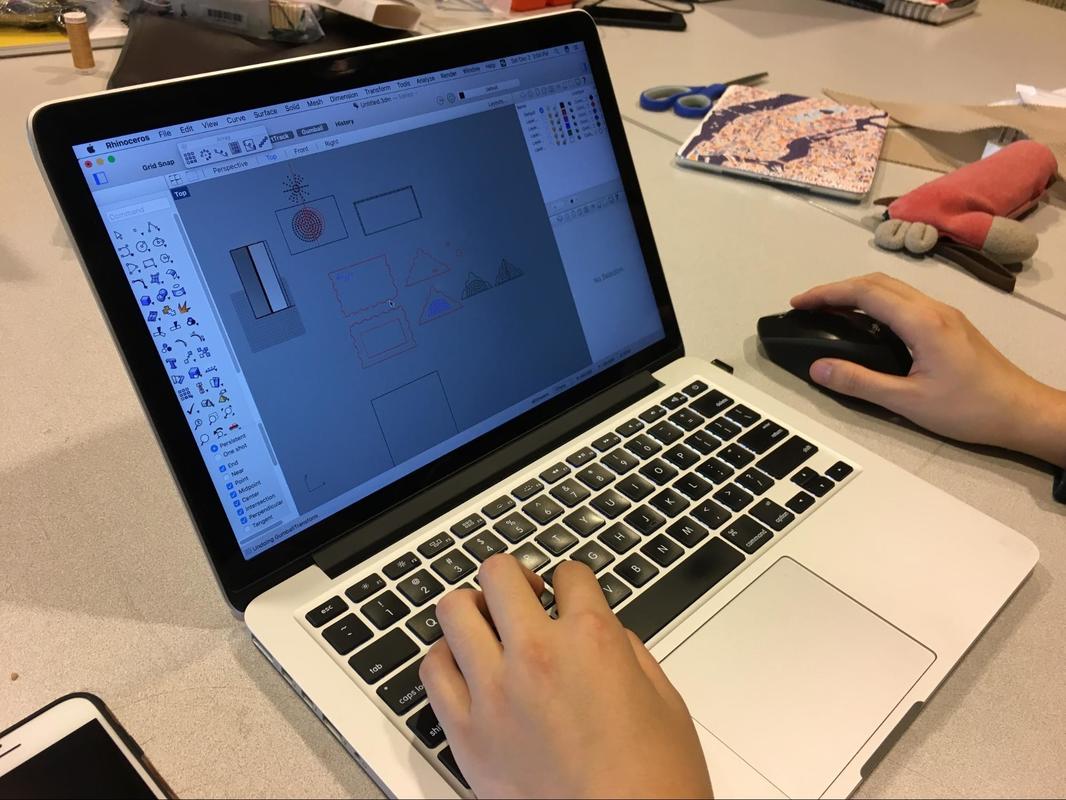
Next, we iterated on the shape of the product with sketches and 3D models. The final result is a more compact, sleek design that can be folded to form a portable shape.
|
|

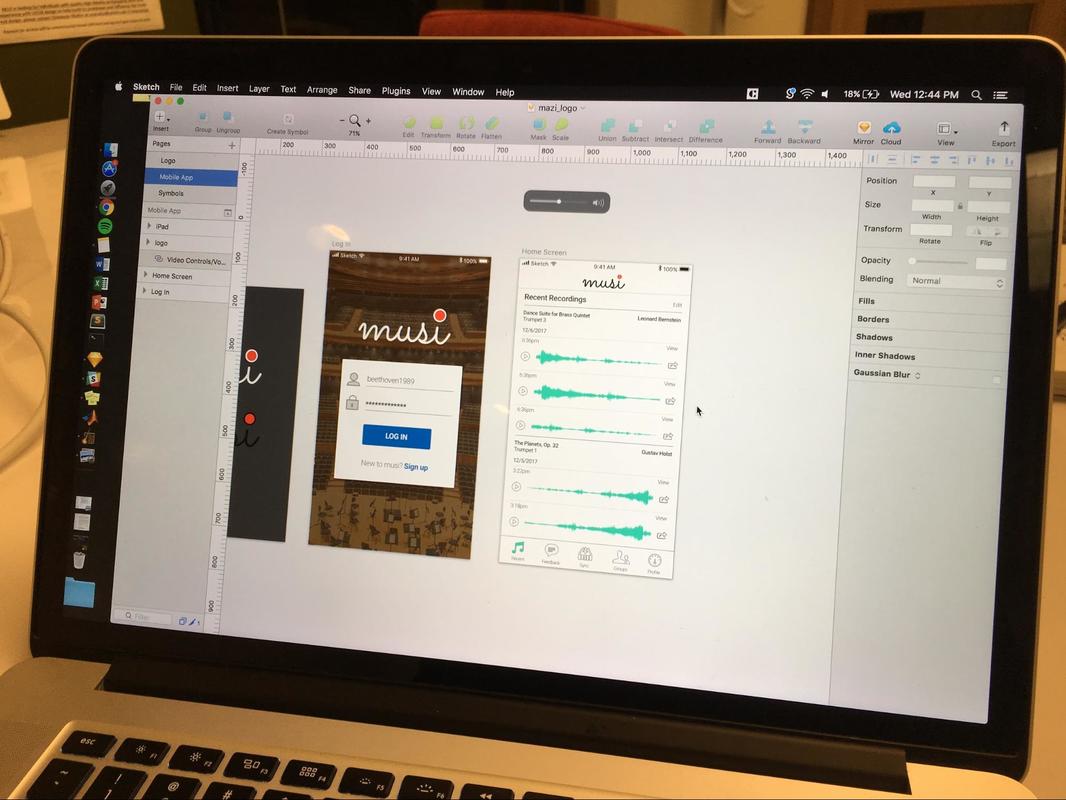
We brainstormed our product name and used a script font that looks elegant and classic to make our logo. We also prototyped the basic functionality of the companion mobile app using Sketch to envision how users would interact with the two components during practice.
|
|
|
The logo was added onto the back of the wooden box as a finishing touch to our product. We used laser cutting technology to make the wooden part and sewed vinyl fabric into the shape we designed.
|
|
Demo Experience
alongside a peer, at the user’s convenience. Our most important features are the recording, playing, and sharing of practice tracks, and our demo captured these main tasks effectively. Moreover, our demo illustrated how users can focus on playing their instruments while starting and stopping the recording and playback process, without the hassles of current recording systems that require a complicated setup of wires, amplifiers, and microphones, or manipulating numerous knobs and buttons with hands that should be attending to the playing of the instrument.
Our demo did not capture the entire experience of using the companion app to connect with a much larger ensemble or peer network; providing comments on recordings; or managing one’s own body of recordings. However, we learned during our user enactments that users were most interested in loading and playing tracks of different parts for their own instrument - for example, someone who is playing the part of Trumpet 2 would want to hear Trumpet 1 and Trumpet 2. Moreover, our demo illustrated the opportunity for musicians to listen to recordings as a method of reflection, which is a primary goal over the commenting feature. Thus, we consider our demo successful in representing the key value Musi adds to a musician’s practice regimen.
Our demo did not capture the entire experience of using the companion app to connect with a much larger ensemble or peer network; providing comments on recordings; or managing one’s own body of recordings. However, we learned during our user enactments that users were most interested in loading and playing tracks of different parts for their own instrument - for example, someone who is playing the part of Trumpet 2 would want to hear Trumpet 1 and Trumpet 2. Moreover, our demo illustrated the opportunity for musicians to listen to recordings as a method of reflection, which is a primary goal over the commenting feature. Thus, we consider our demo successful in representing the key value Musi adds to a musician’s practice regimen.
Demo Insights
A concept demo can be conveyed through various levels of fidelity: through sketches, paper prototypes, wizard of oz enactments and a working core feature. Making a working prototype led us to think about the form of the product: what would fit in with a musicians environment and daily life.
Form and aesthetics evolve gradually over time through regular discussions
We explored many possibilities in materials and shapes, but through an iterative process, we reached a form that everyone in the team was excited about. Although some materials might look great, they might not last, or might not provide enough protection to the electronic components which will be embedded inside it. Before we invested in buying materials, we did our initial prototyping using digital tools, paper and drawer liners. Once we had a form in mind, it was much easier for us to think about the material and recognize what might look good when one of us went to a fabric shop. Our moodboard also helped us guide the aesthetics of the product. The prismatic form of our screen and speaker case eventually led us to a triangular shape of the foot mat. The shape and aesthetics developed gradually, with almost daily discussions about small changes.
Open source code and examples could save you a lot of time in prototyping an experience
For our initial attempts at prototyping the experience of recording, we tried using the mobile browser’s WebAudio API. This failed spectacularly. Ironically, the iOS Safari supports video recording, but not audio recording. We then pivoted to using laptop as our primary computation and recording device, and using a phone or a tablet as a mirrored display. It was not easy to figure out how to record as well as play audio, and our initial attempts were clunky at best. But while looking for ways to visualize audio waveforms, we stumbled across an implementation of Audacity (an open source audio recording tool) using browser technologies. This was a great breakthrough for us, and helped make our demo very effective.
Electronic prototyping requires a focus and care
Electronic prototyping was a slow process. One of the biggest roadblocks was implementing something as simple as buttons. We initially tried using a flat force sensor to use as a button, but its values would oscillate randomly and we could not understand why it was behaving that way. Our next attempt was using tactile switches. We found many ways of implementing a simple switch, which was a confusing process. We implemented 5 parallel switches on breadboards, and got a working system to trigger record, play, metronome, seek back and forward. However, when we soldered the switches for operation by foot, something went wrong and the system stopped working. After hours of debugging with the help of our GSI, we found one misplaced wire that was the root cause of the issues.
A companion app mockup helped close the gaps in our demo experience
Although our working prototype demonstrated the main features, it did not convey the idea of the system as a whole. This gap was fulfilled by creating a companion app which demonstrated how users will load and share audio recordings with their ensemble members, teachers and the public. Its design also offloaded many of the features onto a cloud platform that we would otherwise be needed to implement on the device itself, and lead to a clumsy experience of bending down and interacting with the screen of the device.
In the end, our prototype helped us present the vision of our product in a way that confirms the value of our product for music students.
